vendredi 22 janvier 2010

Bertoo's Cowl


Bertoo's Cowl

Version française disponible sous peu

My boyfriend wanted a cowl, and after surfing on the net and finding nothing to suit what I was envisioning, I decided to create my very own.

Stuff
- 1 skein of Araucania Nature Wool Chunky (131 yards/ 100g)
- 1 set of 5 dnps size US 10 / 6 mm OR 1 set of US 10 / 6mm circular needles of 16"
- Tapestry needle

Stitches
- Loose ribs (multiple of 3 sts):
  • Rnd 1 : *K1, K1 leaving it on left needle, P2tog this st and the next st* repeat to end of rnd.
  • Rnd 2 : K all
  • Repeat those 2 rnds.
- 1 x 1 Ribbing
  • Rnd 1 : *K1, P1* repeat until end of rnd.
  • Repeat this rnd.
Gauge
  • 4 sts in Loose Ribs = 1" blocked.
Finished measurements (blocked)
  • 10" wide and 9.5" long

Make the Cowl
  • Cast on 84 sts. Join in round, beeing careful not to twist.
  • Work 7" of Loose ribs, ending with a rnd 2.
  • Work in 1 x 1 ribs for 2.5"
  • Cast off in ribbing.
  • Weave in ends. Block to measurements.
Tadam!


mercredi 20 janvier 2010

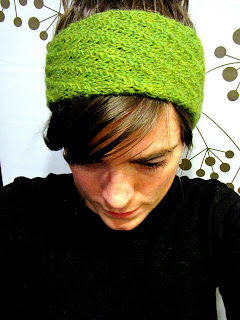
Star stitch headband/bandeau étoile


Star stitch headband

Version française disponible sous peu


Material:
Yarn used: berroco ultra alpaca (100 to 110 yards)
Needle: US 8 / 5.0 mm
Tapestry needle


Gauge:
20 stitches / 26 rows = 10 cm (4")

Presentation of the project:
The stitch I used for this headband is the Star s
titch from “A time to knit” blog (http://atimetoknit.blogspot.com/2007/10/holding-hands-feeding-ducks-pattern.html). I’ve already made a scarf with that stitch and I really enjoyed it. I really wanted to use this stitch on another piece and I found that it would be perfect on a headband. So here it is!

MS: Make Star as follows: P3 tog but leave stitches on left needle. Wrap yarn around the working needle once, then purl the same 3 stitches together again.
M1: make one stitch (pickup horizontal strand between stitch just worked and next stitch)

For a 56 cm head circumference. Please note that for a head circumference of 56 cm the head band will measure 52 cm because of the extension of the wool.


Project:


CO 24 Stitches (1 stitch at the beginning and 1 at the end always knitted, so the pattern is actually worked on 22 stitches)

Pattern

Row 1 (RS): Knit all stitches
Row 2 (WS): K1, (MS, P1) rep. to last 4 stitches, P3, K1

Row 3: Knit all stitches
Row 4: K1, P1, MS, (P1, MS) rep. to last 3 stitches, P2,
K1
Row 5: Knit all stitches

Row 6: K1, P2, MS, (P1, MS) rep. to last 2 stitches, P1, K1

Row 7: Knit all stitches

Row 8: K1, P3, MS, (P1, MS) rep. to last stitch, K1

Row 9: Knit all stitches

Rep these 9 rows until piece 4 times (piece measures 12 cm)


Increase: it’s an increase of 4 stitches. The increase is made on a wrong side. Make a stitch after each star (MS) except after the last one.

For example, if you’re doing it on the second row of the pattern you will have:

Row 2 (WS) increase row: K1, MS, (M1, P1, MS) rep. to last 4 stitches, P3, K1 (28 stitches)


After the increase row, P2 instead of P1 in each repeated sec
tion (see next pattern)
Row 1 (RS): Knit all stitches
Row 2 (WS): K1, MS (P2, MS), rep. to last 4 stitches,
P3, K1
Row 3 (RS): Knit all stitches
Row 4: K1, P1, MS, (P2, MS) rep. to last 3 stitches, P2, K1
Row 5: Knit all stitches

Row 6: K1, P2, MS, (P2, MS) rep. to last 2 stitches, P1, K1

Row 7: Knit all stitches

Row 8: K1, P3, MS, (P2, MS) rep. to last stitch, K1
Row 9: Knit all stitches
Row 10: K1, P4, MS, (P2, MS) rep. to last 5 stitches, P4, K1


Follow this pattern until piece measures 26 cm then place marker. It’s the centre of the headband. Continue to knit until piece measures 40 cm. After that, make a decrease row.


The decrease row is made on the star stitch on the wrong side. Instead of pearling 3 stitches as usual, purl 4 stitches. Do it 4 times, you have now 24 stitches.

After the decrease row, follow the first pattern, until piece measures 52 cm.
Bind of loosely.
Block if necessary.
Sew the 2 parts of the headband together.

mardi 12 janvier 2010

Sarah, tweed beret

En ce début de nouvelle année, nous avons le plaisir de vous offrir un nouveau patron gratuit! / For the new year, we have the pleasure to give you a free pattern!

Sarah est un bérêt facile à réaliser. La large bordure de côtes lui permet de rester bien en place et de garder vos oreilles au chaud. Le subtil motif ajoute de l'intérêt à cette construction simpliste. / Sarah is an easy knitted beret. The large ribbed brim keeps your ears warm and keeps it in place. The subtile pattern adds interest to the simple construction.


MATERIEL / STUFF

- 2 pelotes /skeins Berroco Blackstone Tweed (50g, 119m / 1.75oz, 130yds)
- 3.5mm / US4 : set de 5 aiguilles double-pointes / set of 5 dpns needles
- 4.5mm / US7 : aiguilles circulaires de 24" et un set de 5 aiguilles double-pointes/ 24" circular and dpns needles
-Marque-maille / Stitch marker
- Aiguille à laine / Tapestry needle

ÉCHANTILLON / GAUGE

- 18m /sts x 25 rangs/ rows = 10 cm /4" en jersey endroit / in stockinette stitches.

ABBRÉVIATIONS / ABBREVIATIONS

- K : À l'endroit / Knit
- P : À l'envers / Purl
- SSK : Glisser 2 mailles à l'endroit sur l'aiguille droite, les remettre sur l'aiguille gauche, tricoter ces 2 mailles ensemble à l'endroit / Slip 2 stitches knitwise on right needle, slip back on left needle, knit those 2 stiches together.
-K2tog : Tricoter 2 mailles ensemble à l'endroit / Knit 2 stitches
together
-M1 : Faire une augmentation intercalaire en utilisant le fil entre 2 mailles *Ne pas oublier de faire une maille torse avec cette augmentation afin de ne pas avoir de trou* / Make 1 stitch with the thread between the 2 stitch *Don't forget to twist the stitch to prevent a hole*
SK2P : Glisser une maille à l'endroit sur l'aiguille gauche. Tricoter les 2 mailles suivantes ensemble à l'endroit. Passer la maille glisser par-dessus les mailles tricotées ensembles. / Slip one stitch knitwise. K2tog. Pass slip stitch over the K2tog.

POINTS UTILISÉS / STITCHES

- K1P1 ribbing:
  • Rnd 1 : *K1, P1* Répéter jusqu'à la fin du rnd /Repeat until end of rnd
  • Rnd 2 : Comme Rnd 1 / As Rnd 1
  • Répéter ces 2 rnds /Repeat those 2 rnds.
PATRON / MAKE THE HAT

  1. Monter 100m avec les aiguilles 3,5mm. Joigner en rond en faisant attention de ne pas tordre les mailles. Placer le marque maille./ Cast on 100st using the US4 needles. Join in round been careful not to twist. Place the stitch marker.
  2. Faire 5cm de K1P1 ribbing / Work in K1P1 ribbing for 2"
  3. Passer aux aiguilles circulaires / Switch to circular needles.
  4. Prochain rond / Next Round : *K5, M1* jusqu'à la fin du rond /until the end of round (120 m /sts)
  5. Commencer avec le premier rang de la grille. Faites la grille complète 3 fois. / Begin with the first row of the chart. Do the complete chart 3 times.
  6. Faire la grille de diminution 1 fois. / Do the diminution chart once.
  7. Couper la laine et passer dans les mailles restantes. Tirer et attacher solidement. Rentrer les fils. / Cut yarn and pass thread throught remaining stitches. Pull and tightly attached. Weave in ends.
  8. Bloquer si nécessaire / Block if necessary

Grille / Chart
Diminutions


Et voilà! Un bérêt simple et facile à réaliser! / Here you go! A simple and easy to make beret!