vendredi 19 février 2010

Ateliers tricot suite

Chose promise, chose due, je me suis sacrifiée pour aller voir ce qu'était cet atelier tricot dans le Vieux port. En fait, c'est plus un cours d'initiation donné par Ginette, la proprio de l'Effiloché . Il n'y a rien d'exceptionnel à voir là, à moins de vouloir apprendre le tricot ou à moins, qu'en tant que tricot addict, vous trainiez partout avec vous votre projet tricot et que vous vouliez tricoter dans une cabane à laquelle il manque 3 murs et qui a une grosse résistance au plafond pour faire semblant de nous garder au chaud. Bon ok, je ne pense pas que ça vaut le déplacement, sauf peut être pour voir le bécyc à gaz (expression empruntée à mon beau-père!) tout tricoté pour rester au chaud. Ca m'a fait penser au phénomène knitta please qui s'amuse à tricoter des chandails pour lampadaires!


Bon, je ne résiste pas à dévoiler une de mes prochaines créations, largement inspirée par knitta please (puisque cette photo vient de leur site internet). C'est pas cute?


jeudi 18 février 2010

Ateliers tricot

Je viens d'aller faire un tour sur le site internet de Montréal en Lumières et j'ai découvert avec surprise et joie, qu'il y avait des ateliers tricot pendant toute la durée de l'évènement. Ces ateliers se déroulent sur la place Jacques Cartier dans le Vieux Port. Pour plus d'informations, je vous invite à visiter à cliquer ici.

Je vais certainement aller y faire un tour ce soir et promis, je ferai un petit compte rendu de mon expérience (veuillez noter que Christian sera certainement avec moi et qu'il risque de me faire rapidement sentir son agacement ce qui pourrait expliquer que je ne vais pas rester longtemps!)

lundi 1 février 2010

Venez faire chauffer vos aiguilles le 8 février


(english version below)
Lundi le 8 février prochain, notre amie Rhea qui travaille à la Coop la Maison Verte organise une soirée tricot, qu'il ne faut rater sous aucun prétexte si : vous aimez tricoter, vous aimez boire du moka équitable, vous aimez les lieux qui inspirent la sérénité. Bon, si vous aimez juste tricoter, vous pouvez venir quand même, on ne vous forcera pas à boire du moka!


En plus de tout ça, venir à la Coop la maison verte, c'est aussi l'occasion de rencontrer des personnes qui aiment tricoter. L'idée c'est de partager nos connaissances et nos savoir-faire et tous les niveaux sont les bienvenus.

Pour plus d'informations sur la Coop la Maison Verte: http://www.cooplamaisonverte.com/

La soirée commenceà 19h et se termine à 21h.

Au plaisir de vous voir là-bas!

---------------------

Next monday the 8th february, our friend Rhea is organizing a knitting evening at la Coop la Maison Verte. Don't miss this event, if : you love to knit, you love to drink fairtrade moka, you love relaxing places. Ok, if you just like to knit,you won't have to have a fairtrade moka!

Furthermore, to assist this event is an occasion to meet people who love to knit (some of them are just addicted!). It's an easy way to share skills and know-how. So don't be shy if you're a beginer.

For more informations about la Coop la Maison Verte : http://www.cooplamaisonverte.com/

The event will begin at 7 PM and end at 9 PM.

Hope to see there!

vendredi 22 janvier 2010

Bertoo's Cowl


Bertoo's Cowl

Version française disponible sous peu

My boyfriend wanted a cowl, and after surfing on the net and finding nothing to suit what I was envisioning, I decided to create my very own.

Stuff
- 1 skein of Araucania Nature Wool Chunky (131 yards/ 100g)
- 1 set of 5 dnps size US 10 / 6 mm OR 1 set of US 10 / 6mm circular needles of 16"
- Tapestry needle

Stitches
- Loose ribs (multiple of 3 sts):
  • Rnd 1 : *K1, K1 leaving it on left needle, P2tog this st and the next st* repeat to end of rnd.
  • Rnd 2 : K all
  • Repeat those 2 rnds.
- 1 x 1 Ribbing
  • Rnd 1 : *K1, P1* repeat until end of rnd.
  • Repeat this rnd.
Gauge
  • 4 sts in Loose Ribs = 1" blocked.
Finished measurements (blocked)
  • 10" wide and 9.5" long

Make the Cowl
  • Cast on 84 sts. Join in round, beeing careful not to twist.
  • Work 7" of Loose ribs, ending with a rnd 2.
  • Work in 1 x 1 ribs for 2.5"
  • Cast off in ribbing.
  • Weave in ends. Block to measurements.
Tadam!


mercredi 20 janvier 2010

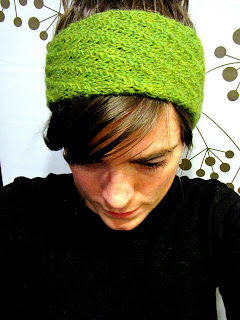
Star stitch headband/bandeau étoile


Star stitch headband

Version française disponible sous peu


Material:
Yarn used: berroco ultra alpaca (100 to 110 yards)
Needle: US 8 / 5.0 mm
Tapestry needle


Gauge:
20 stitches / 26 rows = 10 cm (4")

Presentation of the project:
The stitch I used for this headband is the Star s
titch from “A time to knit” blog (http://atimetoknit.blogspot.com/2007/10/holding-hands-feeding-ducks-pattern.html). I’ve already made a scarf with that stitch and I really enjoyed it. I really wanted to use this stitch on another piece and I found that it would be perfect on a headband. So here it is!

MS: Make Star as follows: P3 tog but leave stitches on left needle. Wrap yarn around the working needle once, then purl the same 3 stitches together again.
M1: make one stitch (pickup horizontal strand between stitch just worked and next stitch)

For a 56 cm head circumference. Please note that for a head circumference of 56 cm the head band will measure 52 cm because of the extension of the wool.


Project:


CO 24 Stitches (1 stitch at the beginning and 1 at the end always knitted, so the pattern is actually worked on 22 stitches)

Pattern

Row 1 (RS): Knit all stitches
Row 2 (WS): K1, (MS, P1) rep. to last 4 stitches, P3, K1

Row 3: Knit all stitches
Row 4: K1, P1, MS, (P1, MS) rep. to last 3 stitches, P2,
K1
Row 5: Knit all stitches

Row 6: K1, P2, MS, (P1, MS) rep. to last 2 stitches, P1, K1

Row 7: Knit all stitches

Row 8: K1, P3, MS, (P1, MS) rep. to last stitch, K1

Row 9: Knit all stitches

Rep these 9 rows until piece 4 times (piece measures 12 cm)


Increase: it’s an increase of 4 stitches. The increase is made on a wrong side. Make a stitch after each star (MS) except after the last one.

For example, if you’re doing it on the second row of the pattern you will have:

Row 2 (WS) increase row: K1, MS, (M1, P1, MS) rep. to last 4 stitches, P3, K1 (28 stitches)


After the increase row, P2 instead of P1 in each repeated sec
tion (see next pattern)
Row 1 (RS): Knit all stitches
Row 2 (WS): K1, MS (P2, MS), rep. to last 4 stitches,
P3, K1
Row 3 (RS): Knit all stitches
Row 4: K1, P1, MS, (P2, MS) rep. to last 3 stitches, P2, K1
Row 5: Knit all stitches

Row 6: K1, P2, MS, (P2, MS) rep. to last 2 stitches, P1, K1

Row 7: Knit all stitches

Row 8: K1, P3, MS, (P2, MS) rep. to last stitch, K1
Row 9: Knit all stitches
Row 10: K1, P4, MS, (P2, MS) rep. to last 5 stitches, P4, K1


Follow this pattern until piece measures 26 cm then place marker. It’s the centre of the headband. Continue to knit until piece measures 40 cm. After that, make a decrease row.


The decrease row is made on the star stitch on the wrong side. Instead of pearling 3 stitches as usual, purl 4 stitches. Do it 4 times, you have now 24 stitches.

After the decrease row, follow the first pattern, until piece measures 52 cm.
Bind of loosely.
Block if necessary.
Sew the 2 parts of the headband together.

mardi 12 janvier 2010

Sarah, tweed beret

En ce début de nouvelle année, nous avons le plaisir de vous offrir un nouveau patron gratuit! / For the new year, we have the pleasure to give you a free pattern!

Sarah est un bérêt facile à réaliser. La large bordure de côtes lui permet de rester bien en place et de garder vos oreilles au chaud. Le subtil motif ajoute de l'intérêt à cette construction simpliste. / Sarah is an easy knitted beret. The large ribbed brim keeps your ears warm and keeps it in place. The subtile pattern adds interest to the simple construction.


MATERIEL / STUFF

- 2 pelotes /skeins Berroco Blackstone Tweed (50g, 119m / 1.75oz, 130yds)
- 3.5mm / US4 : set de 5 aiguilles double-pointes / set of 5 dpns needles
- 4.5mm / US7 : aiguilles circulaires de 24" et un set de 5 aiguilles double-pointes/ 24" circular and dpns needles
-Marque-maille / Stitch marker
- Aiguille à laine / Tapestry needle

ÉCHANTILLON / GAUGE

- 18m /sts x 25 rangs/ rows = 10 cm /4" en jersey endroit / in stockinette stitches.

ABBRÉVIATIONS / ABBREVIATIONS

- K : À l'endroit / Knit
- P : À l'envers / Purl
- SSK : Glisser 2 mailles à l'endroit sur l'aiguille droite, les remettre sur l'aiguille gauche, tricoter ces 2 mailles ensemble à l'endroit / Slip 2 stitches knitwise on right needle, slip back on left needle, knit those 2 stiches together.
-K2tog : Tricoter 2 mailles ensemble à l'endroit / Knit 2 stitches
together
-M1 : Faire une augmentation intercalaire en utilisant le fil entre 2 mailles *Ne pas oublier de faire une maille torse avec cette augmentation afin de ne pas avoir de trou* / Make 1 stitch with the thread between the 2 stitch *Don't forget to twist the stitch to prevent a hole*
SK2P : Glisser une maille à l'endroit sur l'aiguille gauche. Tricoter les 2 mailles suivantes ensemble à l'endroit. Passer la maille glisser par-dessus les mailles tricotées ensembles. / Slip one stitch knitwise. K2tog. Pass slip stitch over the K2tog.

POINTS UTILISÉS / STITCHES

- K1P1 ribbing:
  • Rnd 1 : *K1, P1* Répéter jusqu'à la fin du rnd /Repeat until end of rnd
  • Rnd 2 : Comme Rnd 1 / As Rnd 1
  • Répéter ces 2 rnds /Repeat those 2 rnds.
PATRON / MAKE THE HAT

  1. Monter 100m avec les aiguilles 3,5mm. Joigner en rond en faisant attention de ne pas tordre les mailles. Placer le marque maille./ Cast on 100st using the US4 needles. Join in round been careful not to twist. Place the stitch marker.
  2. Faire 5cm de K1P1 ribbing / Work in K1P1 ribbing for 2"
  3. Passer aux aiguilles circulaires / Switch to circular needles.
  4. Prochain rond / Next Round : *K5, M1* jusqu'à la fin du rond /until the end of round (120 m /sts)
  5. Commencer avec le premier rang de la grille. Faites la grille complète 3 fois. / Begin with the first row of the chart. Do the complete chart 3 times.
  6. Faire la grille de diminution 1 fois. / Do the diminution chart once.
  7. Couper la laine et passer dans les mailles restantes. Tirer et attacher solidement. Rentrer les fils. / Cut yarn and pass thread throught remaining stitches. Pull and tightly attached. Weave in ends.
  8. Bloquer si nécessaire / Block if necessary

Grille / Chart
Diminutions


Et voilà! Un bérêt simple et facile à réaliser! / Here you go! A simple and easy to make beret!

vendredi 18 décembre 2009

Super soft neckwarmer

Donc voilà, je me suis enfin lancée! Depuis le temps que j'en rêvais d'un "chauffe cou" (excusez la traduction littérale de neckwarmer!), voilà que je l'ai fait! En fait, je voulais qu'il soit doux ET esthétique ET chaud car par ici le temps est un peu frais ce qui n'empêche pas d'être élégante.
J'ai commencé par tricoter un neckwarmer sur le patron Fawn Pea, le Quickie Cowl (qui porte bien son nom puisque je l'ai tricoté en 2 heures!). J'ai utilisé 2 pelotes laine Sulka ultra douce et ultra agréabla à tricoter.
Ensuite, j'ai décidé de doubler le chauffe cou avec du tissus. Comme je suis une passionnée de tricot et que je suis aussi écolo, il n'était pas question que j'achète du tissus neuf pour faire la doublure! J'ai donc utilisé le tissus d'une vieille chemise dénichée par Ariane dans un magasin d'occasion. Le mieux dans cette histoire, c'est que ce tissus est exactement ce que je cherchais pour la doublure c'est à dire des petits motifs floraux rouges! Ce qui m'amène directement à l'aspect esthétique de la chose. Pour lui donner un peu de piquant, j'ai confectionné une fleur avec un reste de laine rouge. Je l'ai cousue avec de la laine blanche qu'il me restait du cowl. Pour coordonner le tout, j'ai fixé la doublure, à laquelle j'ai préalablement fait un ourlet (à la main svp!), avec la laine rouge de la fleur et en faisant apparaitre les points.

Donc voilà le résultat qui certes demande amélioration mais qui me satisfait pas mal pour une première fois!


Here is the english version...please forgive my poor written english :)
So here we are! I finally did it. I've always wanted to have a neckwarmer for these cold days in Canada but i wanted it soft AND pretty AND warm.
I began knitting the Fawn Pea pattern, "Quickie Cowl", which name fits perfectly (i knitted it within 2 hours) using 2 skeins of Sulka which is super extra soft and pleasant yarn to knit.
After that, i decided to had a tissu layer to the neckwarmer. As i'm also an environmentalist and a passionnate knitter, there was no question for me to buy a brand new tissu. So i used an old shirt found by Ariane in a second-hand store. And guess what, this is exactly the kind of tissu that i wanted for my cowl, a floral pattern in the red shade! This drives me directly to the esthetics aspects of the things. To pimp my cowl (not my car), I made a red flower that I sewed on the cowl with some leftovers from the white yarn of the cowl. After that I sewed the lining to the cowl with some leftovers from the red yarn of the flower.

You can see below the result of my intensive work which not too bad for a first attempt but which reclaims improvments!


Get the flash player here: http://www.adobe.com/flashplayer