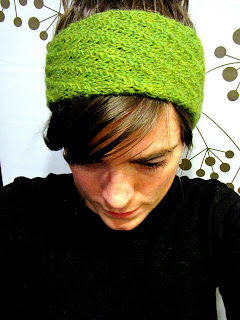
Star stitch headband
Version française disponible sous peu
Material:
Yarn used: berroco ultra alpaca (100 to 110 yards)
Needle: US 8 / 5.0 mm
Tapestry needle
Gauge:
20 stitches / 26 rows = 10 cm (4")
Presentation of the project:
The stitch I used for this headband is the Star stitch from “A time to knit” blog (http://atimetoknit.blogspot.com/2007/10/holding-hands-feeding-ducks-pattern.html). I’ve already made a scarf with that stitch and I really enjoyed it. I really wanted to use this stitch on another piece and I found that it would be perfect on a headband. So here it is!
MS: Make Star as follows: P3 tog but leave stitches on left needle. Wrap yarn around the working needle once, then purl the same 3 stitches together again.
M1: make one stitch (pickup horizontal strand between stitch just wor
 ked and next stitch)
 For a 56 cm head circumference. Please note that for a head circumference of 56 cm the head band will measure 52 cm because of the extension of the wool.
Project:
CO 24 Stitches (1 stitch at the beginning and 1 at the end always knitted, so the pattern is actually worked on 22 stitches)
Pattern
Row 1 (RS): Knit all stitches
Row 2 (WS): K1, (MS, P1) rep. to last 4 stitches, P3, K1
Row 3: Knit all stitches
Row 4: K1, P1, MS, (P1, MS) rep. to last 3 stitches, P2, K1
Row 5: Knit all stitches
Row 6: K1, P2, MS, (P1, MS) rep. to last 2 stitches, P1, K1
Row 7: Knit all stitches
Row 8: K1, P3, MS, (P1, MS) rep. to last stitch, K1
Row 9: Knit all stitches
Rep these 9 rows until piece 4 times (piece measures 12 cm)
Increase: it’s an increase of 4 stitches. The increase is made on a wrong side. Make a stitch after each star (MS) except after the last one.
For example, if you’re doing it on the second row of the pattern you will have:
Row 2 (WS) increase row: K1, MS, (M1, P1, MS) rep. to last 4 stitches, P3, K1 (28 stitches)
After the increase row, P2 instead of P1 in each repeated section (see next pattern)
Row 1 (RS): Knit all stitches
Row 2 (WS): K1, MS (P2, MS), rep. to last 4 stitches,
P3, K1 Row 3 (RS): Knit all stitches
Row 4: K1, P1, MS, (P2, MS) rep. to last 3 stitches, P2, K1
Row 5: Knit all stitches
Row 6: K1, P2, MS, (P2, MS) rep. to last 2 stitches, P1, K1
Row 7: Knit all stitches
Row 8: K1, P3, MS, (P2, MS) rep. to last stitch, K1
Row 9: Knit all stitches
Row 10: K1, P4, MS, (P2, MS) rep. to last 5 stitches, P4, K1
Follow this pattern until piece measures 26 cm then place marker. It’s the centre of the headband. Continue to knit until piece measures 40 cm. After that, make a decrease row.
The decrease row is made on the star stitch on the wrong side. Instead of pearling 3 stitches as usual, purl 4 stitches. Do it 4 times, you have now 24 stitches.
After the decrease row, follow the first pattern, until piece measures 52 cm.
Bind of loosely.
Block if necessary.
Sew the 2 parts of the headband together.


Finalement, y aura-t-il la version francophone?
RépondreSupprimerOkay, so I am trying to knit this headband because it is so cute! But, I am having trouble with the first step. If I just repeat rows 1-9 it doesn't work right. I have 9 great rows and then for the next 9 the pattern ends up on the wrong side. What am I missing? Please let me know when you can! Thanks!
RépondreSupprimerI am collecting patterns to make headbands for a groups of people. I came across yours. It looks very creative and will be fun to try. When I saw that your blog was in French, that was fun too. My family visited Paris in January. We had a very good time. I appreciate the English translation although I am trying to read your French with the little that I know. :) Have a good day.
RépondreSupprimer